
Getting started with Python is an overwhelmingly easy thing. For this reason, it is generally the first programming language lots of people learn. From my perspective, Python is the most versatile and user friendly language for people to get started with. For me, it was the first real language I learned in university studying mechanical engineering. In talking with professors from all over the globe at conferences such as SciPy, they all generally say that basic foundations in Python are a must for all of their students; undergrad, graduate, and PhD students all alike.
Now getting started in Python and getting started in building meaningful tools and applications in Python, is a completely different beasts. Actually sitting down and writing my first python package, wasn’t something that I did until after doing Python development here and there for a few years. I had contributed to other people’s python packages, have created lots of Python code that runs on things like robots, and built tools for automated testing. But writing a package of my own, was somewhat terrifying for me. I’m not exactly sure as to why, but I think it was mostly because I was afraid of admitting to myself that there was something incredibly basic that I didn’t know. In the engineering world, that is something hard to admit to your self; accepting your weaknesses. But what you do about it, is one of the biggest measurements of an engineer. That was all true until the day I said, “Hey, I can figure this out and it’s nothing to be ashamed of.”
Hopefully you have come across this post in search of the same thing I originally set out some time ago and that is to do just what the title says, create a distribute-able Python package. Now, we are technically going a little bit deeper than just creating a directory and putting python code into it, but will also go into how to make this package accessible and install-able by anyone connected to the internet. The assumption that we will be working under for this is that you are already familiar with Git, GitHub, and Python in general to the point that if directions simply say; create a Github repo for this package, you’d know what to do. The reason that I’m extending the basic “how to create a package” is because without people being able to install it with something like a conda install or pip install it’s not really a deployed package IMHO. Without further ado, let’s get started.
Step 1: Create you package structure.
Now, before you jump straight to doing computer’y things, lets grab a notebook and a writing utensil of your choosing. You’d be surprised the amount of pain and frustration you can save yourself by just taking a step back from your computer and pull out your notebook/sketchbook and write out what exactly it is you are wanting to do and approximately how you want to do it. This is an exercise that I used to really hate as a young engineer because I just wanted to start coding and doing the cool stuff. Fortunately I had a great manager who was much wiser and patient than I. That was the whole reason he was where he was and I was where I was. He was an architect and I would say that I was just a hacker at that time. So take some time and really think about how you want to accomplish what it is you are wanting to do. Think about what all of the shortcomings of your architecture are and ask some honest questions about if this is the best you can do.
Once you have written out what it is you are going to do and how to do it, the next thing is to think about naming conventions. Following standards is important and when we fail to do so, we invite chaos. the standard naming convention fo rpython packages is to have a fairly consise name and that it is all in lowercase. For more information on Python best practices; check out PEP8 (https://www.python.org/dev/peps/pep-0008/?) This outlines the standards put out by the original creators of Python about how to best write clean Python code.
After you have your general architecture written out and a good name; now is the time we can take a look at our computers and start doing computer-y things. Here we will start to layout the structure of our package. (Remember, python packages contains modules or python files all organized by the use of directories.). In here you can have a higher level of structure of modules separated by directories.
For the basic package that I will be using to demonstrate, we will be creating a very sparse package called “firstpack” which will demonstrate package structure, have some class definitions, and methods for doing pretty simple stuff. Here in this post, we won’t be demonstrating anything overly fancy but all of this is to demonstrate how easy it is to create your own python package. All of the demo code that will be presented is readily available via our Github page and can be found here: https://github.com/ideaGarageIO/PythonTutorials/tree/master/PackageCreation/Lesson1/FirstPack
To start, we will first create the following directory structure:
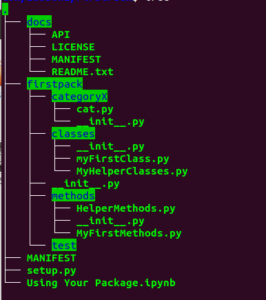
As you can see, there is a parent directory (not using PEP8) which is just the directory in which we are building our package, a directory for the package in following PEP8 standards (this is the thing we will be building), some directories (categoryX, classes, and methods), and then one called tests. If you pulls down the code posted on GitHub, you will have the .ipynb (iPython Notebook) file. If you don’t know about Jupyter Notebooks, check out our article on the subject here.
If you chose to go the route of defining your own structure based on your previous activity, just note that the most important thing is to ensure that all of the directories in your package contain an __init__.py (double-underscore init double-underscore dot py) This python file is completely blank and only servers the purpose of indicating to the python interpreter the directory contains python code. (https://docs.python.org/3/tutorial/modules.html#packages)
As for now, don’t worry too much about the contents of the files shown. For an FYI: everything in the ‘docs’ directory is a text file and the MANIFEST file will be auto generated when we build our package.
Step 2: Write your code
Now that everything is roughed out, we can start writing our code. As indicated before, there’s nothing really to what I have written. In the classes directory, there are a couple of python files that contain class definitions that essentially just print out statements when they are initialized. Then in the method we do some silly stuff. Really I could write out all the code in here but that would be a waste of everyone’s time. If you want to see exactly everything I’m doing, check out the useless code over at the GitHub repo found at: https://github.com/ideaGarageIO/PythonTutorials/tree/master/PackageCreation/Lesson1/FirstPack
Step 3: Write your setyp.py file.
Now that you have the core data for your package good to go, now is the time to do the work to make it install-able. This is done via a python script file called setup.py This is a basic script that imports a function from two possible packages, setuptools (the preferred packaging package within the Python community) and distutils (essentially depricated but still part of the standard library for Python). Now as to why setuptools isn’t part of the standard library, I don’t have the slightest clue and if you could leave the reasoning in the comments below, I’d love to know why.
For our purposes, we are going to use setuptools because it comes as part of the the Anaconda distribution of Python. The same method can be imported as: from distutils.core import setup
Because I will be using setuptools, my code will look like the following:
"""
setup.py install file for the firstpack package
"""

from setuptools import setup

setup(name='firstpack',
version='0.0.1',
description='How to create a python package',
url="https://github.com/ideaGarageIO/PythonTutorials/tree/master/PackageCreation/Lesson1/FirstPack",
author='Cameron Owens',
author_email='cameronallanowens@gmail.com',
license='BSD 3-Clause',
packages=['firstpack','firstpack.classes', 'firstpack.methods','firstpack.categoryX'],
)
Here we just import setup and then feed it some basic arguments. There are several more arguments that you can feed into this function but we will save those for a later date.
Once you have that all in place, uploading your package to PyPI for distribution becomes quite trivial. By uploading it to PyPI allows it to be distributed through pip install. Now the next section is based upon the assumption that you have a PyPI account. If you don’t, simply go to https://pypi.org/ and click on the register button in the top right. You’ll have to submit some basic info like name, email, username, and password. After you do that, you’ll have to verify your account.
Step 4: Upload your package
After you setup your PyPI account, we can now move on to publishing this brand new package. The most simple and straighforward method for doing this can be done with the single command:
python setup.py register sdist upload
Now obviously, this should be run from where your setup.py file is in order to be able to call the script. What this does is it 1: triggers the login sequence (requires your PyPI credentials) 2: puts your package into a tarbal file, and then 3: Uploads it to PyPI.
As a wise man once said, this all made a short story long. Well, hopefully not. Hopefully this was valuable in showing how to easily create and distribute a Python Package. To learn how to distribute it via conda/conda-forge you’ll have to stay tuned for our next post on this subject coming to a browser near you soon!